
For the past few years, I have been working a lot with the third party integrations. Especially, external data sources such as Google Drive, Dropbox, and One Drive.
Eventually, those integrations help customers manage their assets with ease and reduce data storage costs.
I would like to share my experience of integrating services starting with the first how-to article from this series.
In this post, I will describe how to set up the Microsoft’s One Drive integration. I won’t touch the specific cases of adding it to the existing product but will list the required steps to start using their API.
1. Register Application
The very first step before we can start working with the Microsoft API is application registration. Navigate to the app registration portal, log in using your Microsoft credentials, and click “Add an app.”
Just give your app a name and click “Create.” After the creation, the system will navigate you to the app details page.
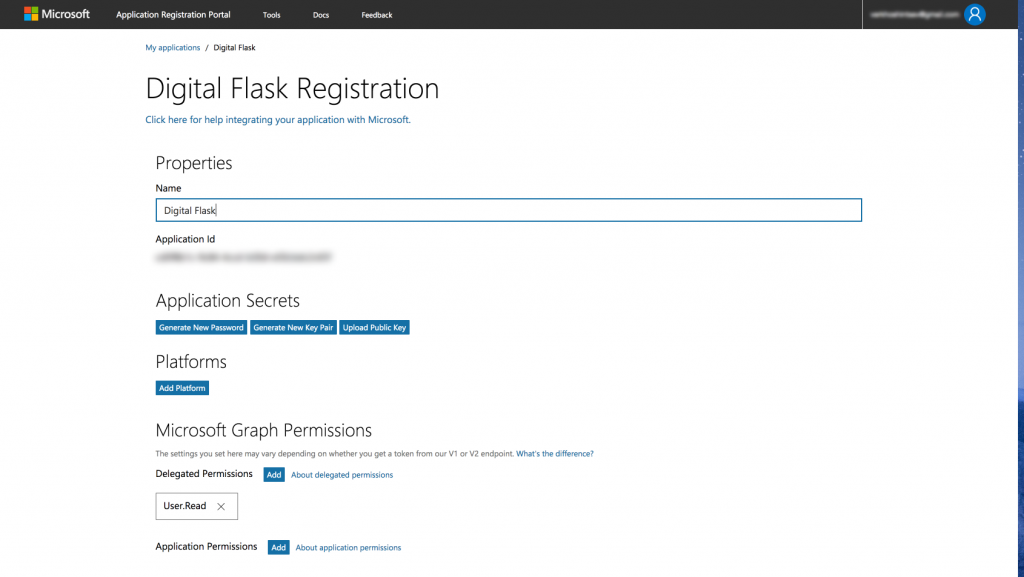
As the next steps, we would need to focus on the following sections: Application Secrets, Platforms, and Microsoft Graph Permissions.
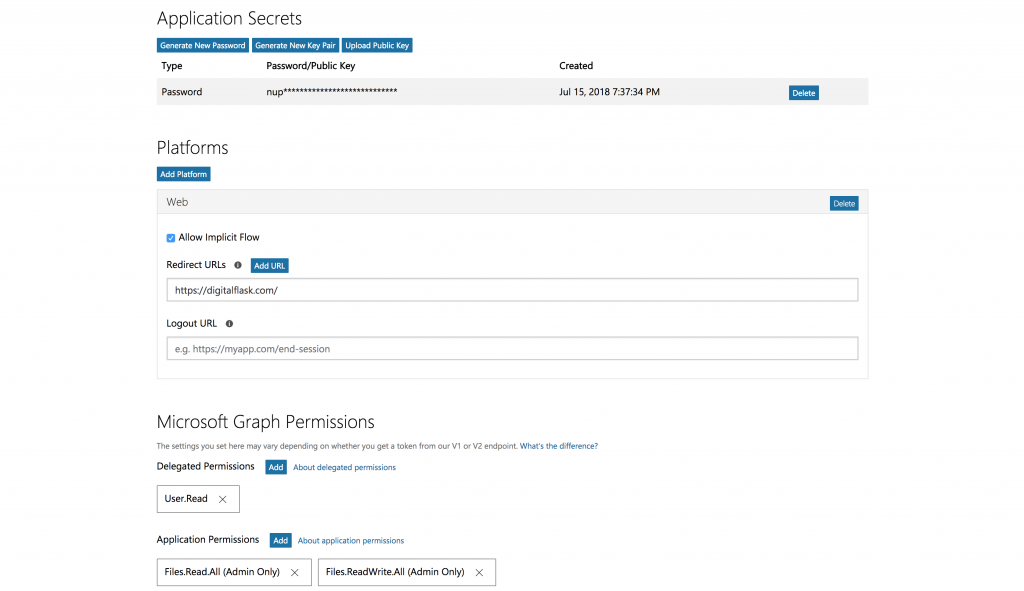
Click the “Generate new password” button. The system will generate the password and display it in the popup window so that you can copy it to the secure place.
However, notice that this is the only time when it will be displayed. You would have to delete it and re-generate if you lose that one.
Then, click the “Add platform” button and select a type of application you would like to integrate. In my case, it was the Web-based platform.
We will allow an implicit flow for the platform. Then enter the redirect URL. Generally, it might be anything, even localhost. We would need it later to generate the authentication code.
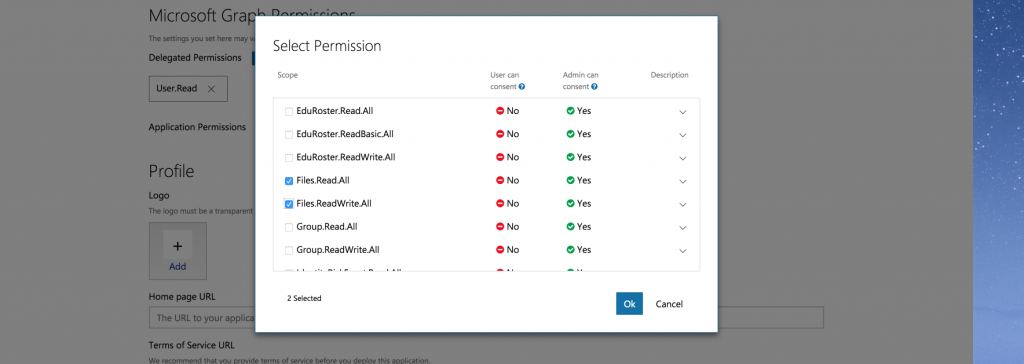
Then move to the next section. You need to add the application permissions. Since we will be working with the One Drive, select everything related to Files.
And this is how your details should look so far.
2. Generate Code
Before start using the service API programmatically, we need to generate the code following the browser authentication flow.
Navigate to the https://login.microsoftonline.com/common/oauth2/v2.0/authorize?client_id={client_id}&scope=offline_access%20files.readwrite.all&response_type=code&redirect_uri={redirect_url} page, where “client_id” is the application ID from the registration portal details and “redirect_url” is the value from the corresponding field of the platform.
Proceed with the login flow using the same Microsoft account. Straight away, the system will redirect you to the specified page with the code given as a query string parameter.

Copy this code from the URL. You will need it for the next step.
3. Authentication Token
To start using the API, you need to generate authentication token which you would have to send along with every HTTP request.
All you need to do is to send the POST request to https://login.microsoftonline.com/common/oauth2/v2.0/token with the following parameters.
An important note, you need to send them only as x-www-form-urlencoded.
- redirect_uri – The same redirect URI used in the code generation process.
- client_id – Application ID from the registration page.
- client_secret – The password you generated during the registration process.
- code – The code from the previous step which you copied from the URI parameters.
- grant_type – Due to the chosen method, it should be “authorization_code.”
As a result, you will get the response similar to the following:
{
  "token_type": "Bearer",
  "scope": "Files.ReadWrite.All",
  "expires_in": 3600,
  "ext_expires\_in": 0,
  "access_token": "EwB...",
  "refresh_token": "MC..."
}
The part of the response we are interested in is the access token. Using it, we can manage the OneDrive files, e.g., retrieve file thumbnails, download files, etc.
Notice: You need to send the request to the Microsoft Graph, not the api.onedrive.com.
Here is an example on how you can get file’s thumbnails in different sizes.
First of all, you need to add the Authorization header like “Bearer {access_token}” and then send the GET request to https://graph.microsoft.com/v1.0/drive/items/{fileId}/thumbnails/ where fileId is the ID of the file stored in the OneDrive.
Another important note, file ID contains the exclamation mark character ("!"). You have to encode it and use "%21" instead. Otherwise, you will get an error.
4. Refresh Token
As you may notice, access token response contains its expiration info. Usually, the access token expires in one hour.
We could use the authorization code to generate the token one more time, but unfortunately, it is not permanent as well. We neither want to continue manual authorization process in the browser.
Despite that fact, we have a solution. Along we the access token we are also getting the refresh token which could use somewhere in future to receive next access token.
Getting it is pretty much the same as getting the access token itself. The only differences are the requesting endpoint and grant type.
Eventually, to renew the access token all you have to do is to send the POST request to https://login.live.com/oauth20_token.srf with the following x-www-form-urlencoded parameters.
- redirect_uri – The same redirect URI used in the code generation process.
- client_id – Application ID from the registration page.
- client_secret – The password you generated during the registration process.
- code – The code from the previous step which you copied from the URI parameters.
- grant_type – This time you are not using authorization code but refresh token, so the value should be “refresh_token.”
Finally, as a result, you would receive the response similar to the regular token besides that it would have the user ID as an addition.
{
  "token_type": "bearer",
  "expires_in": 3600,
  "scope": "Files.ReadWrite.All",
  "access_token": "EwBQ...",
  "refresh_token": "MCRw...",
  "user_id": "AAAAAAAAAAAAAAAAAAAAANlWnzIvvjGUec\_k0C\_sk-w"
}
Now, following these easy steps you would know how to create the Microsoft application, setup OneDrive access, and start using its API.
Using OneDrive API, you could integrate it in with your application and, for instance, give users access to the files located on your data storage or let them uploading files to your drive.
I hope that this post would help you get started with the Microsoft API.

Nikita Verkhoshintcev
Senior Salesforce Technical Architect & Developer
I'm a senior Salesforce technical architect and developer, specializing in Experience Cloud, managed packages, and custom implementations with AWS and Heroku. I have extensive front-end engineering experience and have worked as an independent contractor since 2016. My goal is to build highly interactive, efficient, and reliable systems within the Salesforce platform. Typically, companies contact me when a complex implementation is required. I'm always open to collaboration, so please don't hesitate to reach out!

